The Virtual Views page allows the system administrator to create customized views from objects in the source database. End users can include virtual views as a data source when building reports. Virtual views are saved to the application metadata database; the source database is unmodified.
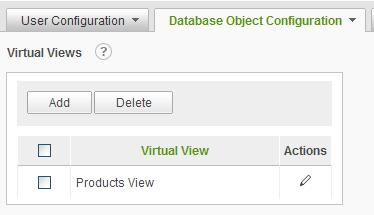
Select Virtual Views from the Database Object Configuration drop-down list to display the Virtual Views configuration page.
Click on the
![]() icon
to display brief help for the Virtual Views page.
icon
to display brief help for the Virtual Views page.
The Add button will display an empty Virtual View page.
The Delete button will remove the selected virtual views. Virtual views are selected by clicking on the applicable checkbox.
|
Note: |
|
Removing a virtual view marks any reports that depended on that virtual view as broken. Delete virtual views with caution. |
The ![]() icon
indicates that only one action can be performed on the virtual view. Click on
the
icon
indicates that only one action can be performed on the virtual view. Click on
the ![]() icon
to modify the virtual view information.
icon
to modify the virtual view information.
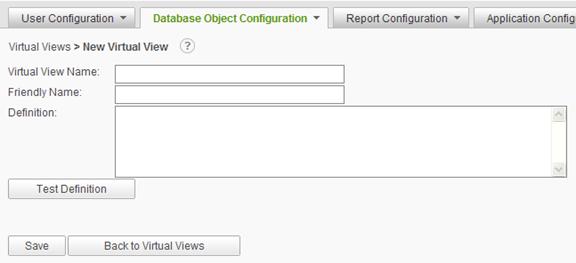
Adding a Virtual View
A virtual view is essentially a pre-defined SQL Select statement. Typically virtual views are used to relate multiple tables, perform data conversions, and reduce the number of data objects that the end user sees.
To create a virtual view, click on the Add button. The following page will be displayed:
Click on the
![]() icon
to display brief help for the Virtual View page.
icon
to display brief help for the Virtual View page.
Enter a unique Virtual View Name, Friendly Name, and Definition. The Definition is a SQL Select statement that conforms to the syntax rules for a SQL sub-query.
|
Note: |
|
Virtual views are implemented in the report definitions as SELECT * FROM (Definition) . |
Click on the Test Definition button to verify the Definition syntactically using the reporting database. If the Definition is tested successfully, the page will display the schema information returned by the query. For example:
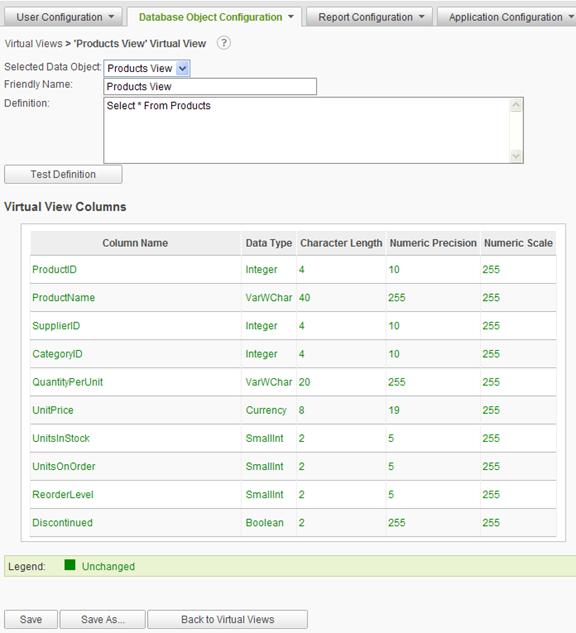
Click on the Save button to store the virtual view definition in the metadata database.
The administrator can create a virtual view by modifying an existing virtual view and then clicking on the Save As button, entering a new Virtual View Name and Friendly Name, and clicking on the OK button.
|
Hint: |
|
Always remember to test the virtual view definition to ensure that the correct data columns are returned. Modifying the sub-query later may break reports that depend on the virtual view for data. |
A virtual
view may be modified by clicking on the ![]() icon in the list of virtual views.
The Friendly Name and the Definition may be modified.
icon in the list of virtual views.
The Friendly Name and the Definition may be modified.
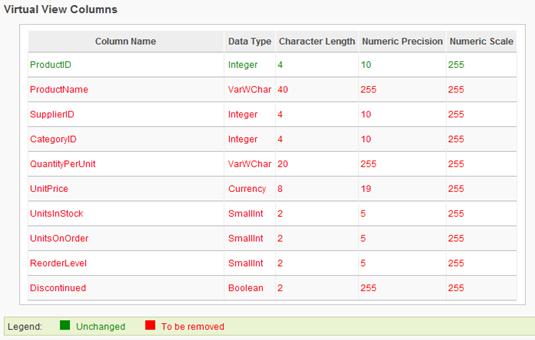
Click on the Test Definition button to verify the new information. The Virtual View Columns grid will be updated and identify the differences between the original Definition and the new Definition. For example:
Click on the Save button to store the modified information in the metadata database.
|
Notes: |
|
1. Modifying a virtual view's sub-query may break reports that depend on the virtual view for data. Modify virtual views with caution. 2. Use only SQL sub-query statements when creating virtual views; statements such as ORDER BY are not supported. For security purposes, the following SQL statements are always prohibited: EXECUTE, INSERT, UPDATE and DELETE. |