Ad Hoc gives the system administrator the ability to establish multiple organizations which are collections of user communities. Every Ad Hoc user must be a member of one organization, typically the Default organization.
Organizations do not share user communities, reports, or data.
|
Note: |
|
The ability to define multiple organizations must be enabled via the Management Console. Refer to the Management Console Usage Guide for details. |
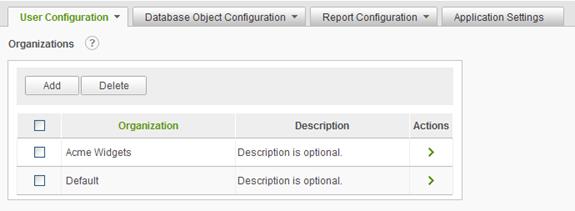
Select Organizations from the User Configuration drop-down list to display the Organizations configuration page.
|
Note: |
|
The Default organization is created with every new installation of the application. System administrators can rename the organization, but it may not be deleted. When attempting to delete the Default organization, all members are deleted, except for the System Administrator. |
Click on the
![]() icon
to display brief help for the Organizations page.
icon
to display brief help for the Organizations page.
The Add button will display an empty Organization page.
The Delete button will remove the selected organizations. Organizations are selected by clicking on the applicable checkbox.
The ![]() icon
indicates that only one action can be performed on the organization. Click on
the
icon
indicates that only one action can be performed on the organization. Click on
the ![]() icon
to modify the organization information.
icon
to modify the organization information.
The ![]() icon
indicates that more than one action can be performed on the organization. Hover
the mouse over the
icon
indicates that more than one action can be performed on the organization. Hover
the mouse over the ![]() icon to display the available
actions and click on the appropriate one.
icon to display the available
actions and click on the appropriate one.
The available actions on the Organizations page are Modify Organization and Set Session Parameters. The Set Session Parameters option will only be displayed if a session parameter has previously been created for the application.
Adding an Organization
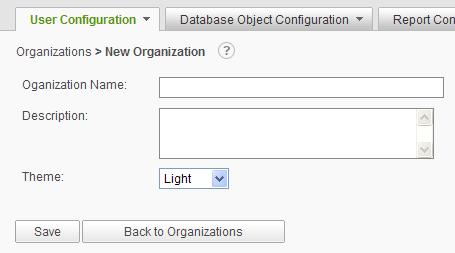
To add an organization, click on the Add button and the Organization page will be displayed:
For brief
help with the page, click on the ![]() icon.
icon.
The Organization Name is required and must be unique. The Description of the organization is optional. The Theme will default to Light and may be changed by selecting another theme from the drop-down list.
Click on the Save button to store the new Organization information.
The Modify Organization page will be displayed (see below).
Adding an Organization Using Save As
The administrator can create an organization by modifying an existing organization and then saving it with a new name by clicking on the Save As button. The Save As option also copies the session parameters and values, if any, from the existing organization to the new organization.
System administrators can change the name, description, and theme of an organization at any time. Each organization must have a unique name.
To change organization information, click the Modify Organization action for the organization. The Modify Organization page will be displayed:
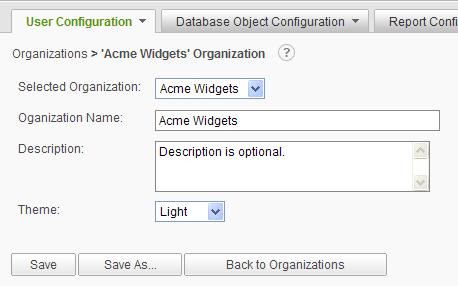
Modify the Organization Name, Description or Theme and click the Save button to store the information.
To save the edited information by a new Organization Name, click on the Save As button, enter the new name and click on the OK button to save the information.
|
Note: |
|
The Selected Organization drop-down list may be used to navigate through organizations and avoid using the Back to Organizations button and selecting a different organization. |
System administrators can create multiple session variables called session parameters that may be used for display purposes or to filter data within a report or data object. Session parameters and values are initially defined with application scope. The session parameter values may be over-ridden for each organization.
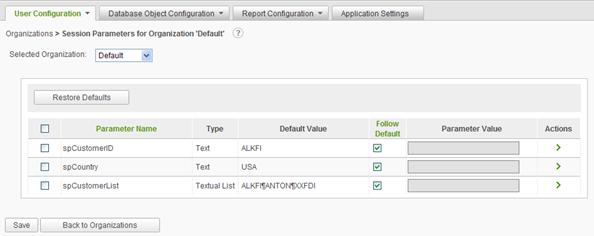
To change the session parameter values for an organization, click on the Set Session Parameters action for the organization. The Organization Session Parameters page will be displayed:
|
Note: |
|
If Session Parameters have not been defined, the option to over-ride the session parameter values for organizations will not be available. |
|
Hint: |
|
Refer to the Session Parameters chapter for help creating parameters and setting the default values. |
For brief
help with the page, click on the ![]() icon.
icon.
The Selected Organization identifies the organization that was the action target from the previous page. The dropdown list allows the Administrator to select other organizations and review or adjust their session parameters without having to return to the Organizations page.
The grid presents the session parameters that may be set for the organization. Click on the Parameter Name or the Follow Default column header to sort the contents of the grid.
The Restore Defaults button provides a mechanism to set all of the highlighted (checked) session parameters back to the values shown in the Default Value column.
The Follow Default checkbox indicates whether the parameter value should adopt the Default Value. This also allows the parameter value to be set permanently , meaning that changes to the Default Value will have no impact on the parameter value for the organization, if the Follow Default checkbox is unchecked.
The grayed Parameter Value text boxes are not disabled. The gray is a visual cue that the value is the same as the default value and is expected to follow the default value. That mean that if the default value changes, the organization will automatically pick up the new value.
The Parameter Value may be changed by either typing directly into the text box or selecting the Modify action and providing a new value. The parameter value may also be changed by selecting the Restore Default action.
If any Parameter Value is set it will be considered an override value and the Follow Default checkbox will automatically be unchecked.
Click on the Save button to store the session parameter values for the organization.
An action that is available for each session parameter is Set By User. Clicking on this action will present a page that allows the session parameter values to be set for all users in the organization.
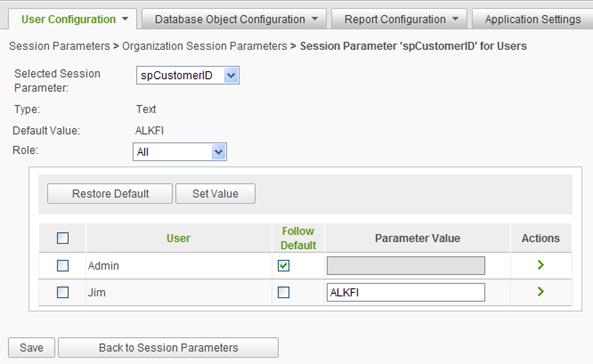
The Selected Session Parameter initially identifies the parameter that was specified when linking to this page. The dropdown list allows the Administrator to review and modify other session parameter values for the group of users.
The Default Value is the value that will be used for all of the users in the list unless the value is specifically over-ridden.
The Type indicates one of the five session parameter types; date, number, numeric list, text and textual list.
The Role dropdown list may be used to filter the list of users. Initially the dropdown indicates All and the list of user are all users in the Organization.
The Restore Default button will set the session parameter value for all selected users back to the displayed Default Value. Users may be selected by clicking on the checkbox next to the user. All users may be selected by clicking on the checkbox in the list header.
The Set Value button will open a dialog to acquire a new value and will apply the value to all of the selected users.
The list of users may be sorted by clicking on the User or Follow Default column header.
The Follow Default checkbox indicates whether the parameter value should adopt the Default Value. This also allows the parameter value to be set permanently , meaning that changes to the Default Value will have no impact on the parameter value for the user, if the Follow Default checkbox is unchecked.
The grayed Parameter Value text boxes are not disabled. The gray is a visual cue that the value is the same as the default value and is expected to follow the default value. That mean that if the default value changes, the user will automatically pick up the new value.
The Parameter Value may be changed by either typing directly into the text box or selecting the Modify action and providing a new value. The parameter value may also be changed by selecting the Restore Default action.
If any Parameter Value is set it will be considered an override value and the Follow Default checkbox will automatically be unchecked.
To change the
parameter value, either enter the new value in the Parameter Value text
box or hover the mousepointer over the Actions ![]() icon and select Modify
from the list of actions.
icon and select Modify
from the list of actions.
The Modify action will present a dialog relevant to the type of the session parameter. Date session parameters will have a date picker control and List session parameters will present a list of values in the dialog.
From the Actions icon, the session parameter value for the related user may be reset to the default value for the Organization by clicking on the Restore Default option.
Click on the Save button to store the session parameter values for the User.