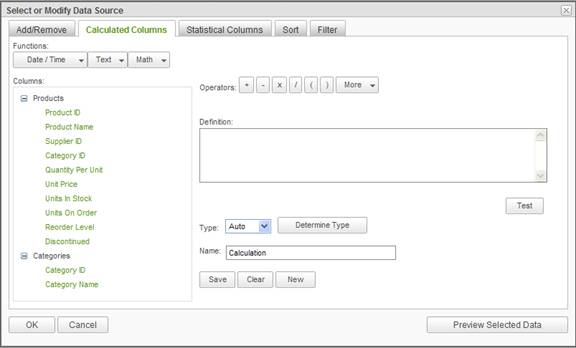
Calculated Columns offer the ability to create new columns for the report based on a specified formula applied to data from existing columns.
In addition to the availability of data source columns, customized columns can be created that consist of calculations performed on data from other columns in the report. Calculations are performed with date, numeric and non-numeric data types. The operands of the formula are either constants or the names of existing data columns included in the report. Users can create formulas from the six provided operators, use the predefined functions or utilize any SQL function supported by the selected report database.
The goal of the calculated column process is to create and name a Definition that the reporting database can interpret and return data. Consequently, the Definition must conform to the reporting DBMS SQL syntax rules for a column.
It is not required that any of the helpful controls are used to create the Definition. Knowledgeable users can simply enter the definition in the text box. It is highly recommended, however, that columns are inserted into the Definition by clicking on the column from the data object/column tree. The column reference will be placed at the last cursor position in the Definition textbox.
In the upper left corner of the Calculated Columns tab are the most common functions that are used in the definition of a calculated column.
![]()
The functions are categorized according to the generic data types of columns; date, text, and numeric data. The dropdown lists may be viewed by hovering the mouse over the buttons. Click on the function to insert the reference into the Definition textbox. For the functions requiring additional arguments or information, a dialog will be presented to complete the function. For example, the Text/Concatenate function will display the following dialog:
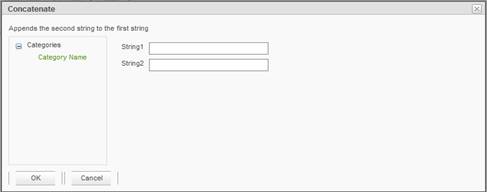
To complete this particular dialog, click on the String1 text box and then click on a column. The column reference will be placed into the text box. Only the columns relevant to the function type will be presented for selection. Repeat the process for String2 and click on OK to post the function into the Definition text box. The other function dialogs behave similarly.
On the left side of the Calculated Columns tab of the Select or Modify Data Source dialog is the data objects/columns tree. To place the column reference into the Definition, click on the column.
After a calculated column has been defined, the data
objects/columns tree will be refreshed and the calculated column added to the
tree along with two management actions. Click on the ![]() icon to edit the
calculated column definition. Click on the
icon to edit the
calculated column definition. Click on the ![]() to remove the calculated column.
to remove the calculated column.
At the top of the right side of the Calculated Columns tab are operators that may be added to the Definition.
![]()
Clicking on any of the operators will place the symbol in the Definition at the last cursor position. The More dropdown list contains the AND, OR, and NOT operators that may be added to the Definition by clicking on them.
The Definition text box is the actual work area. It may be populated from the functions, columns and operators available or the user can enter the calculated column definition directly by typing in the textbox.
The Test button will verify that the calculated column definition meets the syntax rules for the reporting DBMS. If so, a mini-report displaying the calculated column and the underlying data from the reporting database will be shown.
Ad Hoc must know the data type of the resultant calculated column. In most cases the data type can be accurately determined from the data type of the underlying columns or calculation. The Auto option allows Ad Hoc to use the implied data type. To provide the specific data type or override the implied data type, either select the data type from the Type dropdown list or click on the Determine Type button.
Enter the Name of the calculated column in the provided textbox.
The Preview Selected Data button will display a report of all of the columns, including the defined calculated column in the Selected Data Preview dialog. From this report dialog, clicking on the Select and Continue button will save the current calculated column definition and dismiss all of the dialogs.
The Save button verifies the Definition, stores the Name and Definition temporarily, clears the Definition textbox and updates the data object / column tree.
The Clear button erases the contents of the Definition textbox.
The New button clears the contents of the Definition textbox and resets the Name. If the existing Definition has not been saved, a confirmation dialog will be shown.
The Cancel button will discard any changes made in the Select or Modify Data Source dialog and dismiss the dialog.
Click the OK button to save all of the changes made in the Select or Modify Data Source dialog. The newly defined calculated columns are then available for selection in the Report Builder.
|
Note: |
|
A calculated column must be used in the report for the column to be saved in the report definition. Unused calculated columns are automatically removed from the report definition. |